| * DESIGN FILE * | Building a wooden propeller: * P.1 * P.2 * P.3 * P. 4 * ***T-SHIRTS*** |
|
Use this pattern to lay out the required number of laminations on a sheet of 1/2 inch (12.7 mm)
marine-grade plywood ("marine" because this grade is less likely to have internal voids than is
common plywood.) Be sure to carefully locate the center point in each case. The patterns can be
interfingered on the sheet to minimize waste. Use a sabre or band saw to carefully cut out the
laminations - again saving the line - and then carefully drill each for a 3/4 inch (19 mm)
diameter propeller shaft. The next step is to make the assembly platform, exactly 16 inches (406.4 mm) square. The same 1/2 inch (12.7 mm) plywood may be used, solidly mounted on a 1-1/2 inch (38 mm) thick frame on the underside, and with a block 1-1/2 inch (38 mm) thick by 4 inch (100 mm) square underneath in the center. This should be drilled carefully for a 3/4 inch (19 mm) dowel, perpendicular to the platform and extending 6 inches (150 mm) above it. Taking each lamination in turn, place it over the dowel on the plaform and, using its outer edge as a guide, sand off the tip of each blade to a uniform 8 inch (203 mm) radius. Before we assemble the laminations we must prepare three jigs to insure their proper positioning while being epoxied together. These jigs are made of thin, stiff cardboard (manila file folders will do). Each consists of a strip of width of the same number of 1/2 inch (12.7 mm) laminations as the propeller itself, and cut to a step-like profile identical with that of the lamination-blanks at the blade tips. The next step is to make a trial assembly of the laminations on the platform. Position the helicoidal-surface up on the dowel, with each blade having the trailing-edge element at the left, and the laminations rotated clockwise from the top down to the platform in accordance with the tip-jig used as a guide on the outer surface of their tips. When all is in order, remove them from the platform, rub the dowel thoroughly with some wax and cover the platform with a sheet of waxed paper cut to fit over the dowel. Now start the epoxied assemply, being sure each successive surface is completely and uniformly coated, and carefully positioned with the aid of the jigs pinned around the outer surface. Place the same amount of weights uniformly over each blade-stack while curing. A wood rasp is the best tool for the initial removal of the corners of the laminations down to the helicoidal surface of the face of the blades, followed by progressively finer wood files. In doing this, note that all the plywood laminations should be kept as straight radial lines. Do not deal with the other side of the blades at this time. With the helicoidal face of the blades thus roughed out, we can now turn our attention to the outline shape of the blades themselves. To make a pattern for the blade profile we will fit a piece of thin, tough cardboard to the present fan-shaped surface of the blade face. Since the helicoidal blade surface is three-dimentional, it will not lie flat, but the difference is not too great and the approximation is reasonable. Align a straight edge of the cardboard with the radial line of the trailing edge, and by cut-and-try, fit the inner edge of the cardboard as close as |
possible to the curve where the blade surface meets
the hub cylinder. (Note that the length of the line equals the length of the hypotenuse
at x(hub)=72 degrees: in our case, 3-1/8 inches (79.4 mm).) When this is done, lay the cardboard
flat and spot a series of points about 1/2 inch (12.7 mm) apart along this line. Using them as
centers, and a compass setting of 3-3/4 inches (92.25 mm), the radius at maximum blade curvature, 5 inches;
minus hub radius, 1-1/4 inches, draw a series of arcs on the pattern . A smooth curve across their
tops will be the intersection of the cylinder of 5 inches (127 mm) radius with the helicoidal
surface. We must next lay off the required blade-width along this line. To do this take a strip of paper and lay out the required blade width of 4 inches (102 mm) along one edge. Then place this edge outside, on the convex side of the above curve, with one endpoint at the straight trailing edge and tangent to the curve and, in essence, "roll" this edge along the curve. This is done by using a sharp pencil-point pressed close to the edge of the strip as a pivot, and rotating the strip just a bit to a new point of tangency along the curve. Holding the strip in this new position, the pencil point is shifted a bit further along the strip, and the strip again rotated to a new point of tangency. This process is called "ticking off" the length along the curve, and obviously the closer together the successive pivot points, the more accurate the transfer of the dimension. Turning our attention next to the tip of the blade, draw in a circle of 1-1/4 inch (31.75 mm) diameter tangent to the straight-line trailing edge and tangent to a line perpendicular to it at its end. A fair curve drawn through the end of the hub intersection, the point of maximum blade width, and tangent to the last-mentioned circle will be the profile of the leading edge of the blade. This pattern is then cut out and used to trace the outline on each blade, being careful to keep the straight edge in line with the trailing edge, and the hub cut-out snug against the hub. Use a coping saw to trim the wood to this profile. 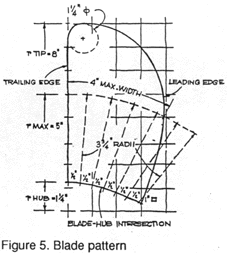 |
© 2001-2013 by Philip Thiel Seattle WA USA |