| * DESIGN FILE * | Building a wooden propeller: * P.1 * P.2 * P. 3 * P. 4 * ***T-SHIRTS*** |
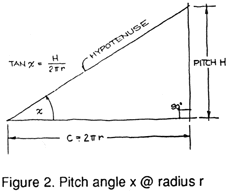 If we unwrap one of these co-axial right circular cylinders and lay it out flat, the helix it contains will appear as the hypotenuse of a right triangle whose base is the circumference C of that cylinder (C=2  r) and whose altitude
is the pitch H. The angle between the hypotenuse and the base is the pitch angle x, whose tangent
is H/(2r). r) and whose altitude
is the pitch H. The angle between the hypotenuse and the base is the pitch angle x, whose tangent
is H/(2r).Assuming a maximum blade width of 4 inches (102 mm) at a radius of 5 inches (127 mm)[2], a 2-1/2-inch (63.5 mm) diameter hub, blade thickness of 3/8 inches (9.5 mm), 5/8 inch (16 mm), and 3/4 inch (18 mm) at tip, maximum width, and hub, respectively, and 1/2 inch (12.7 mm) plywood, we can start to determine the pattern fo the blade laminations as follows. First, calculate the pitch angles at the radii of the hub, of the point of maximum blade width, and of the blade tip. These are tan x(hub)=24/(2 1.25)=3.0564 x (hub)=72 deg.tan x(max)=24/(2 5)=0.7641 x (max)=37.5 deg.tan x(tip)=24/(2 8)=0.4776 x (tip)=25.5 deg.Next, draw a series of seven straight horizontal lines 20 inches (500 mm) long on a sheet of drawing paper, exactly 1/2-inch (12.7 mm) apart. About two inches (50 mm) from the left on the bottom line locate three points about five inches (130 mm) apart. These points represent the straight-line element which will be the trailing (after) edge of the propeller blade. At the left element-point, draw a line at the hub pitch angle of 72 degrees; at the center point draw a line at the maximum blade-width radius pitch angle of 37.5 degrees; and at the right draw a line at the tip pitch angle of 25.5 degrees. These inclined lines are the hypotenuses representing the blade face at each radius. |
Above and to the left of the hypotenuse for the pitch angle at maximum blade-width, lay out
maximum blade-width of 4 inches (102 mm), and the blade thickness of 5/8 inch (16 mm), as shown
in the figure. The enclosing rectangle will then determine therequired number and required width
of the plywood laminations on each side of the trailing-edge element at this radius. A similar
procedure, for the same number of laminations and specified blade thicknesses, is followed at
the hub and tip to determine the plywood dimensions on each side of the element at those radii. We are now ready to make the pattern for the blade laminations. On a sheet of tough, thin cardboard, draw three concentric circles at the hub radius of 1-1/4 inches (31.75 mm), maximum blade-width radius of 5 inches (127 mm), and tip radius of 8 inches (203 mm). Then draw three radii at 120 degrees, which will be the trailing-edge elements of the propeller blades. Taking each radius in turn, lay out the lamination widths we have just found, at the appropriate radial distances from the center, along the arcs. To be precise, these distances should be laid out along the arcs, but measuring them as chord dimensions here will provide a little extra margin for the plywood. Connect these points with smooth, fair lines, and we then have the pattern for the lamination. Carefully cut this out of the cardboard, "saving the line", and check for interblade uniformity by tracing each blade pattern one on top of the other on a piece of paper to see if they coincide. 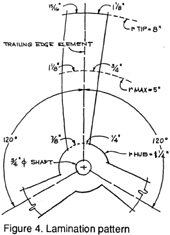 |

© 2001-2013 by Philip Thiel Seattle WA USA |